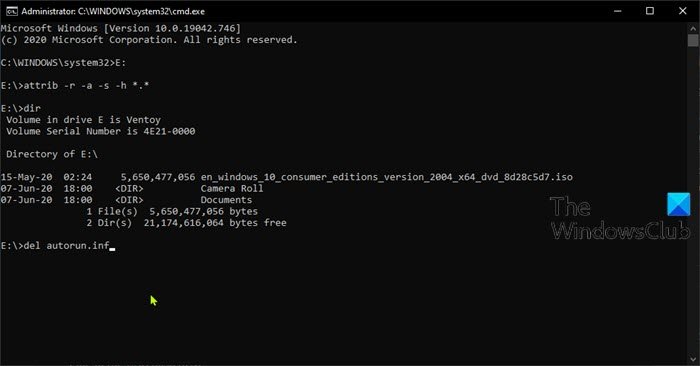
Remove virus from USB Flash Drive using Command Prompt
To remove virus from USB flash drive using Command Prompt in Windows 11/10, do the following:
Power-on your computer.Plug in the USB flash drive.Press Windows key + R to invoke the Run dialog.In the Run dialog box, type cmd and then press CTRL + SHIFT + ENTER to open Command Prompt in elevated mode.In the command prompt window, type the command below and hit Enter.Replace the
Now, type or copy and paste the command below and hit Enter to change the attributes of all the files on the flash drive:
To remove virus from USB flash drive using .bat file in Windows 10, do the following:
Next, type the dir command and hit Enter to display all the files on the flash or hard disk affected by the virus.All the files including the ones that were originally hidden will now be listed.Look for files with an. inf or. lnk extension. The virus on the flash drive very often infects the autorun.inf file.To delete the file, type the command below and hit Enter:
In case you are infected with any other virus, then replace autorun.inf with the extension of the virus your system is infected with such as .exe or .lnk. Read: Free USB security software & antivirus for PC.
Remove virus from USB Flash Drive using Batch (.bat) File
Power-on your computer.Connect your USB, pen drive or SD card to your PC.Press Windows key + R to invoke the Run dialog.In the Run dialog box, type notepad and hit Enter to open Notepad.Copy and paste the syntax below into the text editor.Replace the
Save the file with a name and append the .bat file extension – eg; Remove_Virus.bat.On the Save as type box select All Files.Run the batch file with admin privilege (right-click the saved file and select Run as Administrator from the context menu) to clear and remove the existing shortcut virus.
That’s it on how to remove virus from USB Flash Drive using Command Prompt or Batch File in Windows 11/10! Related post: Check and manually remove malware & virus from Registry.

